- Navigate to Site Permission > Advanced Permission Settings.
- Under Permission, select Create Group.
- Under Give Group Permission to this Site, tick View Only and click Create.
- Now you won't see Download option for the user assigned with View Only permission.
A notes to myself on exploration on System Center, Azure, PowerShell, DevOps and basic stuff.
Saturday, 9 October 2021
SharePoint Online: How to Restrict Download for Document library
SharePoint Online: View Only Permission Level is hidden
Wednesday, 22 September 2021
PowerApps Portal: How to Add Favicon
To add favicon into PowerApps Portal.
- Prepare .ICO file before proceed further. you can use any online site to convert the file. I tried that but not sacrificed with outcome which larger file size from original.
Tips: just rename .PNG to .ICON will do - You can download it from website as well.
Quick hack :- Enter the domain name like https://www.blogger.com/(must end with '/')
- Add favicon.ico to the end
- Press enter (this should be in the URL: https://www.blogger.com/favicon.ico)
- Right click on the image and click "save image as"
- Go to Portal Management Model Driven App and go to Web Files and create new Web File Record. Upload favicon.ico into Notes and published.
- Now you will see your Favicon
IIS: Accidentally deleted IIS Binding Port 80
Saturday, 4 September 2021
Orchestrator: Runbook Error "The term Get-SCSMObject is not recognized as the name of a cmlet..."
Working on a project to upgrade System Center Service Manager (SCSM) and Orchestrator (SCO) 2019 recently, seeing a familiar error message from Orchestrator Runbook again.
Runbook activity show Failed.
Error : The tern 'Get-SCSMObject' is not recognized as the name of a cmlet, function, script file, or operable program. Check the spelling of the name, or if a path was included, verify that the path is correct and try again.
Resolution: Copy SMLets Folder from System32 to SysWOW64 !
|
FROM |
C:\Windows\System32\WindowsPowerShell\v1.0\Modules |
|
TO |
C:\Windows\SysWOW64\WindowsPowerShell\v1.0\Modules |
Happily see the activity completed success now !
Tuesday, 10 August 2021
Useful CMD commands
Notes to myself for quick reference.
Check User account Locked
net user UserID /DOMAIN | FIND /I Account Active
Unlock User
Net user UserID /DOMAIN /active:YES
Change Password
net user UserID newpassword /DOMAIN /Active:Yes
Check User Details, AD group membership
net user UserID /do
Check AD Group Details, Member if this Group
net group GroupID /do
Thursday, 29 July 2021
AD: Guide to Create Custom Attribute to User Class
Pre-requisites
To enable the Active Directory schema for the first time:
- Open an Elevated Command Prompt.
A confirmation message is displayed:
To create a new Attribute:
- Once you've received the confirmation message, enter the command 'mmc' into the command prompt window to open up a new Microsoft Management Console window.
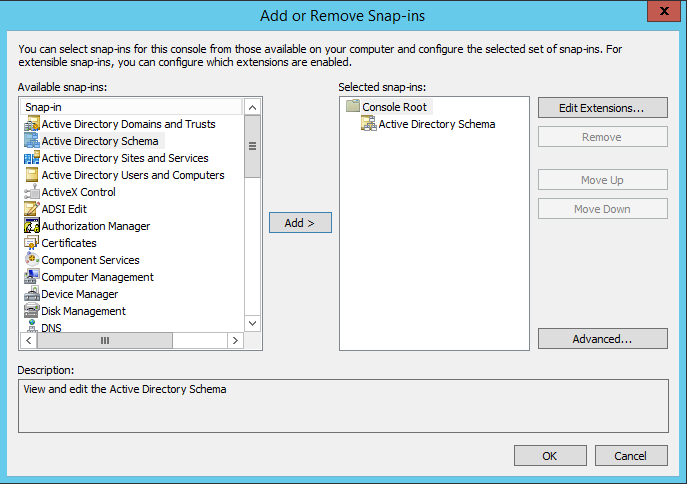
- Choose File > Add or Remove Snap-ins then select the Active Directory Schema option. Double-click or click Add then click OK to load the Snap-in.

3. Once the Snap-in has been loaded, expand this out, right-click on the Attributes entry then select Create Attribute... to continue.
4. Please ensure you read and fully understand the warning as you will not be able to delete created attributes.
5. Please ensure you read and fully understand the warning as you will not be able to delete created attributes.
6. You can retrieve Unique X500 Object ID from here by running the oidgen.vbs.
To Add a new attribute to the User Class:
- From the left-hand pane in the console, expand the Classes folder, locate the user class, then right-click and select Properties. The user Properties window is displayed.
- Open the Attributes tab then click Add...
- Search for the name of your new attribute, highlight this and click OK twice to save the change.
- You will be able to update the data for this new field within the Attribute Editor tab of a users Active Directory entry.
Learning something everyday !